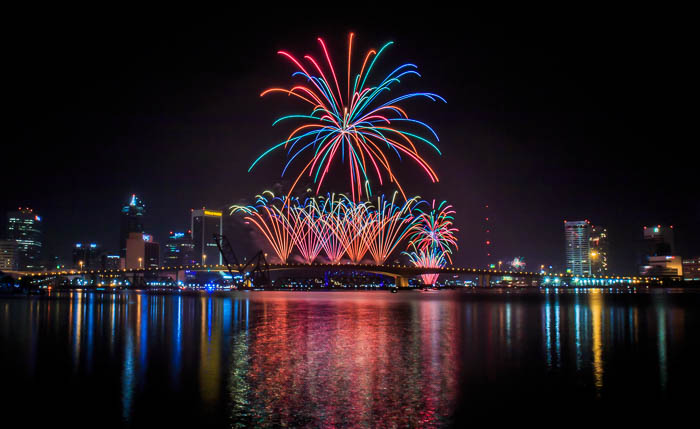
I love photographing fireworks with my DSLR and mirrorless cameras. Over the years I’ve had several opportunities to make images of fireworks, and in doing so I’ve been able to learn quite a bit about technique. I also made plenty of mistakes along the way, so I’ve written this tutorial about how to photograph fireworks in order to help you avoid some of those mistakes. Hopefully, by reading this, you can get started making amazing fireworks photographs right away.
Before we start, I do want to point out one thing. While it’s not 100% essential that you know the relationship between shutter speed, aperture, and ISO for this, I do believe this knowledge is an important foundation that could unlock your creativity in ways you never imagined. If this is something you are struggling with, I recommend you pick up the book “Understanding Exposure” by Bryan Peterson. It was the single most important purchase I made when I was beginning and learning as a photographer.
I’ve separated this tutorial into 4 different lessons. The first three are Preparation, Execution, and Post-Processing. Finally, I finish with a list of More Tips and Tricks that I’ve picked up along the way. If this is your first time here, I encourage you to read each lesson in order, then bookmark this page to come back for reference. Click the links in the contents below to jump to the section you’re looking for.
Let’s get started!
1. Preparation
Things to Bring With You
There are three things that you will definitely need to make quality images of fireworks. There are several other items that could add to the convenience, but these are the only ones that are absolutely necessary.
1. A Digital SLR or Mirrorless Camera
Do I need to spend thousands on a camera to photograph fireworks? No. The nice thing about photographing fireworks is you certainly don’t need a pro-level camera to make amazing images. You can use a basic entry-level DSLR or mirrorless camera and make images just as great as if you had used a top pro camera. In fact, I made many of the images on this page with a Canon EOS Digital Rebel. This is the entry-level DSLR in the Canon line. In the caption of each photo on this page, I’ve indicated the camera, lens, and exposure settings.
2. A Tripod
For photographing fireworks, you need a sturdy tripod and a good firm head to make sure your camera doesn’t move while you are making exposures of the blasts.
What Tripod Should I buy?
There are thousands of tripods available, and the sky is the limit on price. You don’t need to spend a fortune on a tripod for photographing fireworks. In my experience for fireworks, almost all tripod legs are perfectly fine as long as you aren’t using any lenses heavier than a 70-200mm. The head is where things go “sideways” sometimes. If you’re buying your first tripod, I recommend buying an inexpensive light travel tripod. Make sure to select one with a removable/replaceable head. That way you can keep the legs and replace the head if the current head doesn’t keep your camera stable enough.
I’ve accumulated several tripod heads over the years, and the one that I use 90% of the time is the Oben BE-117 Ball Head. As soon as I lock it in place, the camera never moves. It’s slightly spendy for a beginner setup, but it could be the last tripod head you’ll ever need.
You don’t need to spend a fortune on a tripod for photographing fireworks.
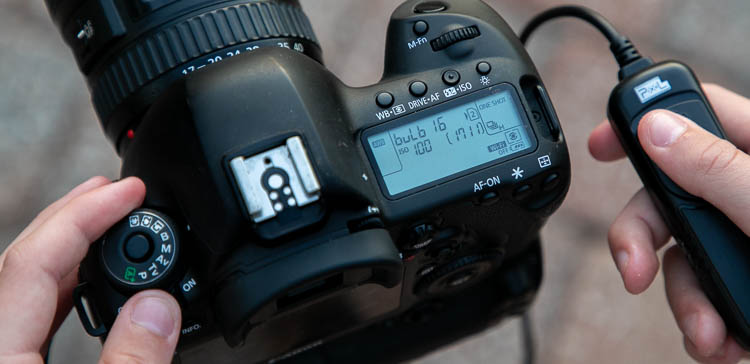
3. A Wired (not wireless) Shutter Release
A wired shutter release is crucial. You will be using it to begin and end your exposures during the fireworks display. It will also allow you to control the shutter without needing to touch the camera itself. This is important because you don’t want the camera to move at all when you are making exposures. I will discuss the wired shutter release in more detail in the “Shutter Speed” section below.
Before You Leave Your House
Before you go to the site there are several other things to consider. Check the forecasted wind speed and direction at the venue where the fireworks will be. If possible, try to select a spot upwind from the blasts. Fireworks produce a lot of smoke. The more it’s floating away from you, the better chances you have of making great images. It might even be worth scouting the location a day or so ahead of time, so you’re more familiar with the venue when you’re planning your placement options.
Leave early to ensure that you are setting up in a favorable spot. This will also give you time to set up your gear and to work on dialing-in your settings. If the venue allows, bring a fold-up chair. I recommend a good tripod chair with a backrest because they are small and easy to carry with you. This is the chair I use. If you plan to arrive super early, you may want to bring a snack and a drink as well. Also, make sure all your batteries are charged (camera, phone, shutter release if applicable, etc.) and consider bringing spares. Finally, make sure you use the restroom ahead of time in case there’s nowhere to go.
Arrival at the Venue
Once you arrive, find your spot, then set up your tripod, camera, and release. Take some time to make test exposures. You don’t need to extend your tripod to its full height if it’s not necessary. I recommend setting it to the minimum height that’s comfortable for you. I like to set mine at a height where the camera is face level when I’m sitting in my tripod chair. Only extend the center column when it’s absolutely necessary.
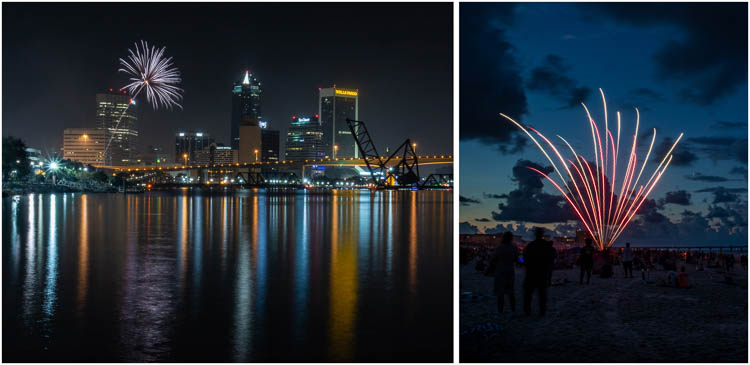
Examples of Poor Preparation
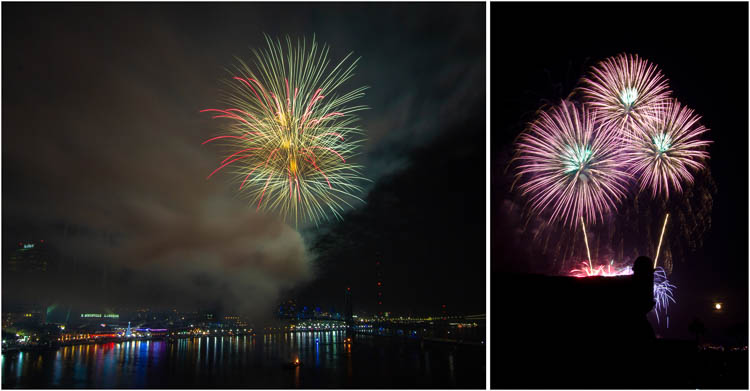
Right: Fireworks over St. Augustine, Florida – July 4, 2012 | Canon EOS 60D | Canon EF-S 10-22mm f/3.5-4.5 USM | 3.0 sec at f/11, ISO 500
Above are two examples of poor preparation in photographing fireworks. The first image is New Year’s Eve fireworks in Jacksonville, Florida. I didn’t check the weather, and I set up downwind from the fireworks. As soon as the show began, the thick smoke drifted slowly in my direction. Because of all the smoke in the way, I didn’t get a single keeper that night.
The second image is 4th of July fireworks in St. Augustine, Florida. I was running late and came close to missing the show. By the time I arrived, I had just enough time to plant my tripod – in a less-than-ideal spot – and begin shooting the display. The result was an entire gallery of overexposed images. I used too high of an ISO because I forgot to change it from a shoot the night before. This was the only image I was able to salvage that night. And it was only because the brightest part was behind the silhouetted fort.
Pro Tip:
When I’m going out by myself to photograph fireworks, I like to pack my camera, tripod and other gear into a backpack, and bring my bicycle to the event. I park 1-2 miles away from the crowds and ride the bicycle to my pre-determined spot. Then I set my stuff up, photograph the show, then quickly pack up and get back on my bike. By the time I get back to my car, I’ve passed everyone walking back to their cars, and drive right home avoiding all of the traffic.
2. Execution
Types Of Fireworks
Before we discuss how to photograph fireworks, we need to understand the two types of fireworks we are likely working with. In my experience as a photographer, I’ve found that fireworks are either Continuous fireworks or Single-Blast fireworks. Both have pros and cons for photography, but both are fun to photograph.

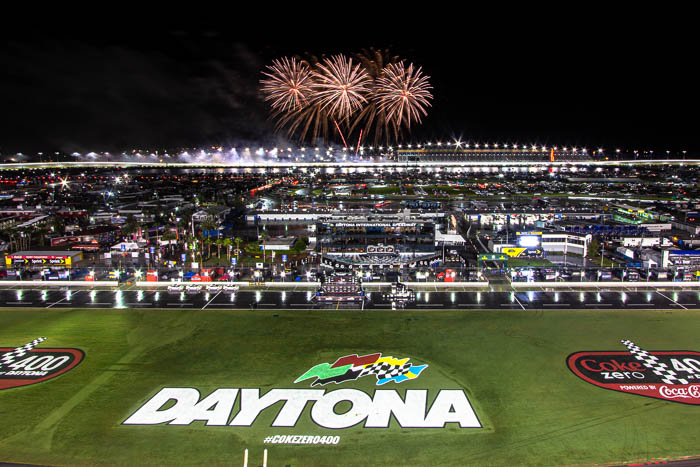
Continuous Fireworks are the type where it seems they are being fired continually throughout the entire display. There are very small breaks and plenty of overlapping from one blast to the next. These are generally used in high-budget displays in big cities or amusement parks. In the case above, it was at the Rolex 24 at Daytona International Speedway.
Single-Blast Fireworks are just as they are named. Each firework is launched one at a time, and there are at least several seconds between each blast. These are generally from smaller lower-budget displays, or consumer fireworks that individuals purchase and launch at home. I find that these are easier to photograph than continuous fireworks, because of their predictability. However, if you want to make images with lots of fireworks, you will need to use some advanced shooting techniques or combine images later with software. I will discuss some of these techniques later in the More Tips and Tricks section.
Consumer Fireworks Safety
While we are on the subject of consumer fireworks, I want to take a moment to discuss fireworks safety. If you plan to launch your own fireworks at home, please check your state and local ordinances to ensure you are within the law. Also, make sure that the safety of your audience and yourself is the number one priority. Below is a video I found on YouTube by Spirit of 76 Fireworks. It outlines how to safely use consumer fireworks. Always remember that safety is your number one concern.
Composition
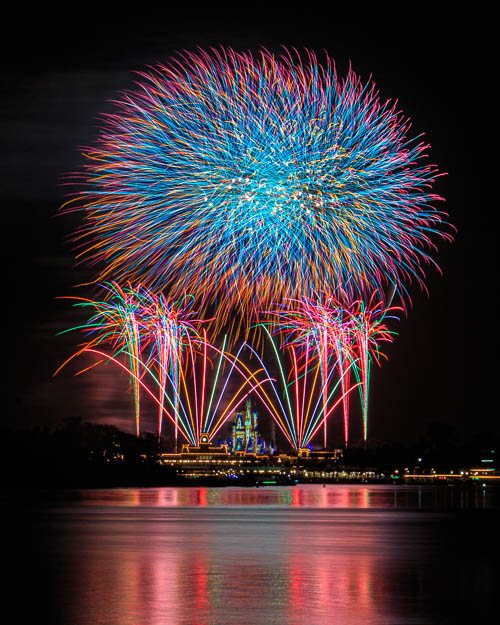
In the preparation step above, you chose a location from which to make your images. Now you need to decide if you will be photographing just the blasts in the sky, or if you want to include an attractive foreground or background to go with your fireworks. Both types look very nice, but personally I find that giving the fireworks a setting and a place makes for a much more compelling image. Check out the two images below. Which type do you prefer?
VS.
Focal Length
I recommend starting with a much wider focal length than you think you need, especially if you’re not familiar with the venue. You can always dial it in during the display. A few times I’ve made the mistake of starting with too much lens and cutting off part of the first few blasts. Sure, the images still look nice, but every time I look at them I wish I would have been just a little wider. 🙂 Check out the photo below. I started with too much lens and cut off the top of the very first blast.
Lenses
When I photograph fireworks, I like to bring an ultra-wide zoom and a normal zoom with me. For example, I’m currently a Canon shooter, so if I’m shooting with a crop sensor, I bring the Canon 10-22mm lens and the Canon 18-135mm lens. If I’m shooting with a full-frame, I bring the Canon 17-40mm lens and the Canon 24-105mm lens. This way I’m covered for several different focal lengths. They should cover you for anything inside a mile or so from the blasts, and maybe even a little more. I never feel like I need anything more than these lenses. However, if you think you are going to be even farther away, you might consider a longer lens.
Focus
There are two methods I use for focusing – plus one slight variation. All have advantages and disadvantages.
Focus Method 1 – Lock the Focus
Before the display begins, find a bright point somewhere near where the fireworks will be launched. Then half-press your shutter to lock your focus onto that point. Once you’ve locked focus, change your camera from auto-focus to manual focus. This will either be done with a physical switch on the lens or through the settings in your camera. Consult your manual if you cannot find where to turn off auto-focus. This method is good when you have a dark foreground and want to begin the exposure before the firework starts rising. The risk is if you miss focus, or accidentally bump the focus ring or change focal length, all of your photos can end up out of focus. So if you use this method, take extra care to not do anything that will change the lens. Also, don’t forget to re-engage your auto-focus when you’re finished.
Focus Method 2 – Auto-Focus for Every Shot
This method is the easiest when there is already plenty of ambient light around the fireworks. Set the camera to one-shot auto-focus, and full-auto focus point selection. Essentially you are letting the camera do all the work in deciding focus on every single photo. I find if the surroundings are bright enough, and the camera easily locks focus when I half-press the shutter, then there’s no reason to not use this method. Even if your surroundings are well in front of or behind the firework, you will likely be fine. You will be shooting at a very narrow aperture (see aperture below) and a relatively wide focal length, so your depth of field will be very large.
The only time I don’t use this method is when it’s extremely dark out and there is nothing in the surroundings to help me lock my focus. If it’s too dark, you may miss a blast because your camera is busy hunting for a focus point.
Focus Method 2 ½
This is actually just a variation of Focus Method 2. Do all the same stuff above, but leave your camera in live-view and make sure the focus point is set to something bright enough to lock onto every time you half-press the shutter. Live-view focus has become more and more dependable over the years. It is now my method of choice in most of my fireworks shoots.
Exposure Settings
For photographing fireworks, each of the three exposure settings (ISO, Shutter Speed, and Aperture) is really very easy. However, each requires an explanation so you can understand why you should choose those settings. For each one, I’ll tell you my recommendation then follow with an explanation.
ISO
I started with ISO because this is the easiest one. Set your ISO to 100 and forget about it.
The ISO and aperture (f-stop) settings affect the amount of light that enters the sensor at any given time. Because fireworks are so bright, your goal in photographing them is generally to limit and control the amount of light entering the sensor. Below I’ll be describing how you will do this using your aperture (f-stop), so there is no reason to set your ISO at anything higher than the lowest setting available.
Shutter Speed
When photographing fireworks, your shutter speed should be different for every photo. Ideally, you will want the shutter to open sometime before the firework is launched, and to close just after the blast is complete, but right before the still-lit embers start to float away in the wind. Obviously, there’s no single shutter speed that you can set that will accomplish this every single time. This is where your wired shutter release will come into play.
Bulb Mode
You will want to set your camera to Bulb Mode and use the wired shutter release to open and close the shutter on demand. This way you can start and stop the exposure precisely when you need to, in order to fully capture a fireworks blast. If you’re unfamiliar with Bulb Mode, click here for a brief explanation to get you started.
How Does Shutter Speed Affect Fireworks?
Before I finish discussing shutter speed, I want to make sure you understand one important concept when it comes to shutter speed and fireworks.
…the shutter speed affects the brightness of the surroundings only, not the brightness or intensity of the fireworks themselves…
As a refresher, let’s discuss what generally happens when you set a longer Shutter Speed in photography. The longer you leave the shutter open, the more time the light from your subject has to reach the sensor. This can cause a relatively dimly lit object in your frame to be more visible in your photograph.
However, Shutter Speed does not affect fireworks in that way. No matter how long your shutter speed is, a 5-second firework is only going to affect your sensor for exactly 5 seconds. Additionally, as the firework rises up into the air, and explodes at the end, it’s only occupying specific places on your sensor for as small as a split second. Whether your shutter speed is 5 seconds, or 20 seconds, or even 120 seconds, it won’t affect the intensity of the light coming from within the firework itself, and onto your camera sensor. So realistically, it doesn’t matter how long your shutter speed is. It just matters that it’s open for the entire duration of the firework.
Check out the first entry in the More Tips & Tricks section below for more discussion on this concept.
To sum it all up – the shutter speed affects the brightness of the surroundings only, not the brightness or intensity of the fireworks themselves. The aperture (or f-stop) is what we use to affect the brightness of the firework. Continue to the next section where I will discuss aperture.
Aperture (or f-stop)
Setting your f-stop is really the key in how to photograph fireworks. The setting you choose here will determine whether the blast is rich in color, or blown-out white. First I will give you the short instructions, followed by the more-in-depth long instructions:
Short Instructions
Set your aperture to f/16 and adjust as needed
Long Instructions
As a refresher, a low f-stop like f/2.8 allows more light into the sensor than a high f-stop, like f/16.
Photographing fireworks is frequently an exposure balancing act. Fireworks blasts are very bright, so you only need a very small aperture to expose them. Ideally, you want to set your f-stop to a place where you won’t lose the color and vibrance of the firework. At the same time, you want to sufficiently expose the surroundings. In my experience, the light of the firework takes precedence over the surroundings. If you have darker surroundings and try to stop down enough to expose well for it, you could lose the color in the firework, thereby losing the image completely. You may need to experiment for your own situation, but I’ve found that f/16 is generally a safe f-stop to start with.
Photographing fireworks is frequently an exposure balancing act.
Sometimes there are occasions where stopping down to a wider aperture works, but you end up with far fewer keepers in my experience. I know this because the first several times I photographed fireworks, I was convinced that f/8 was the best f-stop. Those galleries are loaded with blown-out images. You’ll see some wider-aperture images throughout this article, but they are the exception, not the rule. On the other hand, sometimes there have been situations where f/16 wasn’t enough and I needed to change to f/18 or f/20 or even higher.
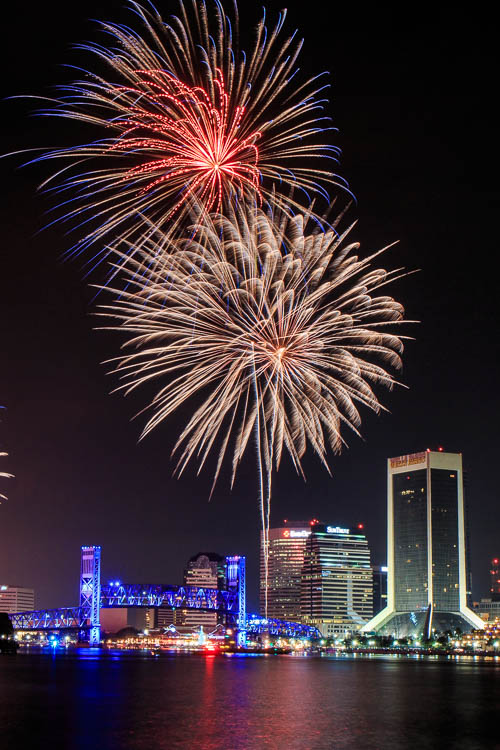
Comparing f/8 vs. f/16
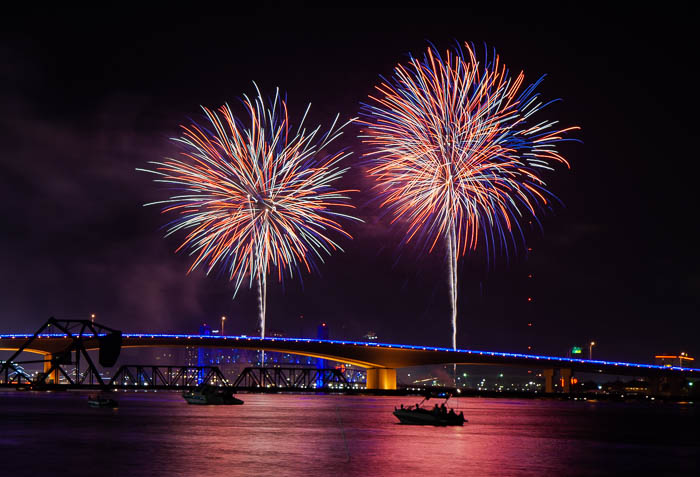
Check out the two images below. Both were made during 4th of July fireworks at Jacksonville Beach, Florida, on different years. Also, both were 3 seconds at ISO 100. The first one was shot at f/8, and the second at f/16. They are both fine shots, but the one on the right preserved so much more color because of the smaller aperture. The trade-off, of course, is that it took a little more post-processing work to bring out the detail in the surroundings. I’ll discuss the image on the right in more detail in the Post-Processing section below.
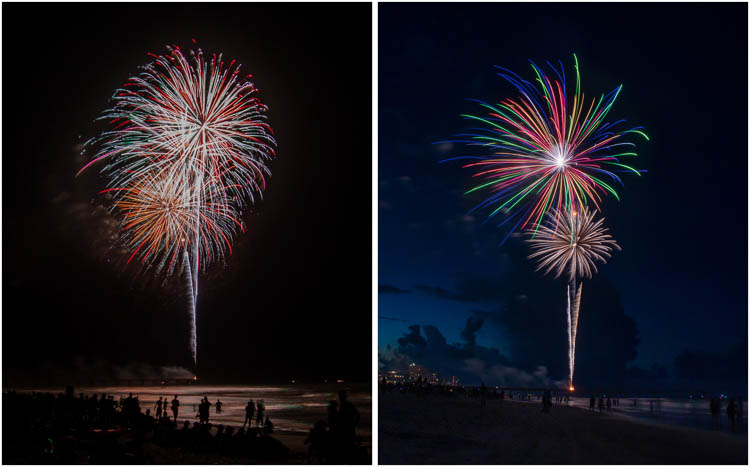
Right: Fireworks over Jacksonville Beach, Florida – July 4, 2018, 9:15pm | Canon EOS M5 | Canon EF-M 15-45mm f/3.5-6.3 IS STM | 3.0 sec at f/16, ISO 100
Finding a Balance
If you cannot find a sufficient balance between a good exposure of the fireworks and the foreground, you have three options.
- Use post-processing to increase the brightness on the foreground. I use this option quite a bit.
- Make a longer-exposure control image before or after the show, and combine it with the fireworks images later by using software.
- Find a new location and ensure that your foreground is bright enough so you can at least recover it in post-processing. Keep in mind this fact: the firework itself will sometimes provide enough light to light your foreground/background if it’s in close enough proximity to the objects on the ground.
Obviously using an aperture this small can make it challenging to achieve a nice exposure on the foreground or background. I will discuss the techniques mentioned in options 1 and 2 in the Post-Processing & More Tips and Tricks sections below.
3. Post-Processing
JPG or RAW?
While it’s not absolutely necessary to shoot in RAW, I highly recommend it for one main reason: dynamic range. Without getting too technical, the dynamic range refers in part to the amount of information you can recover in the dark shadows and bright highlights in an image. When post-processing your fireworks images, you will likely be attempting to bring down your highlights to recover the rich colors in the blast. You will also likely be trying to increase the exposure in your shadows to recover the details in your surroundings. Your RAW images will likely have a dynamic range of a few to several more f-stops than your JPG images. This will give you a greater opportunity to succeed when recovering a blown-out white firework, or a dark shadow.
If you have never used RAW on your camera before, this is the time to try it. Your camera will come with software to process the RAW images. Additionally, there are several other 3rd party options for processing RAW images. I have been using Adobe Lightroom for years and highly recommend it. In fact, below I will discuss post-processing by demonstrating how I process an image in Lightroom.
Processing an Image
Before I start, I want to point out in full-disclosure that I’ve never been formally trained in lightroom. When I first purchased Lightroom (Lightroom 2) around 2008, I also purchased a book about Lightroom workflow to get me started. The book no longer exists, but if you’d like to learn more about Lightroom, I now recommend The Adobe Photoshop Lightroom Classic CC Book for Digital Photographers by Scott Kelby. Since I purchased my first Lightroom book, everything I’ve learned has been through trial and error and by reading books and blogs, and watching YouTube. I always love learning new things, so if anyone uses any processes differently, or has any ideas that would improve my workflow or photo, I’d love to hear about it. Leave a comment below or contact me directly.
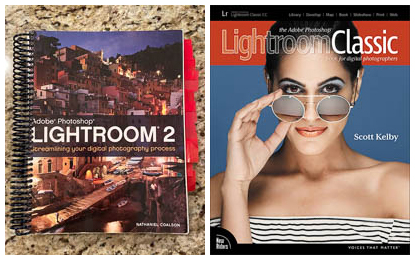
Right: The Adobe Photoshop Lightroom Classic CC Book for Digital Photographers by Scott Kelby
Step 1 – Selecting an Image
The photo we are working with is an image I made of 4th of July fireworks in Jacksonville Beach, Florida. The exposure values were 3 seconds at f16, ISO 100. Ideally, I would have liked to have kept the shutter open for longer than 3 seconds, considering the low ambient light at the beach. But when photographing fireworks, more often than not you don’t get a choice in shutter speed. You take what the show gives you and work with it the best you can.
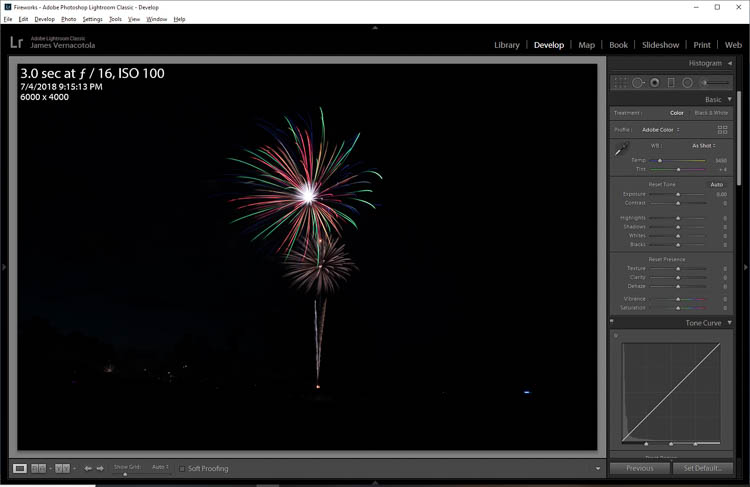
In this photo, it is likely that one firework was just ending and I released the shutter, and then immediately pressed it again to begin a new exposure just before the next one went up. Then I released the shutter at the end of the blast, just before the embers of light began floating away in the air. I like this one because the f/16 managed to keep a great deal of the color in each streak of light in the top blast, with the exception of the hot spot in the center.
Step 2 – Getting Started
My goal with this image is to increase the exposure in the ambient light surrounding the firework. I also want to see if I can bring out more of those colors in the blast, without losing its richness and vibrance. I’d also like to try my best to decrease the brightness of that hot spot so it’s not quite as much of a focal point. I know I won’t be able to completely remove it, but I think I can bring it down quite a bit. Because I shot the image in RAW I know I have more dynamic range to work with than if I had shot it in JPG.
I know that Lightroom’s “Auto” settings will never get a fireworks photo right, but I still always start a photo with the Auto button, just to get Lightroom’s take. Software AI and camera AI get better all the time, so don’t ever feel like you’re doing it wrong if you let them do part of the work sometimes. Once I click the auto button, I start at the top and begin moving the sliders to my liking. So let’s get started.
Step 3 – Global Tone Adjustments
The Auto button attempts to be a jack-of-all-trades, and as I mentioned before it has a hard time with images that are not your normal evenly lit photos. As expected, it tried to recover those dark shadows by increasing the exposure and shadows. In this case, these increases came at the expense of the fireworks blast itself, causing it to be overexposed. It did however start bringing back some of the detail in those shadows. I do love that it revealed some of the blue sky behind the blast. It was 9:15 pm, but in the middle of summer, blue hour can extend well into the evening in Florida. We will continue working on those shadows some of the other steps below.
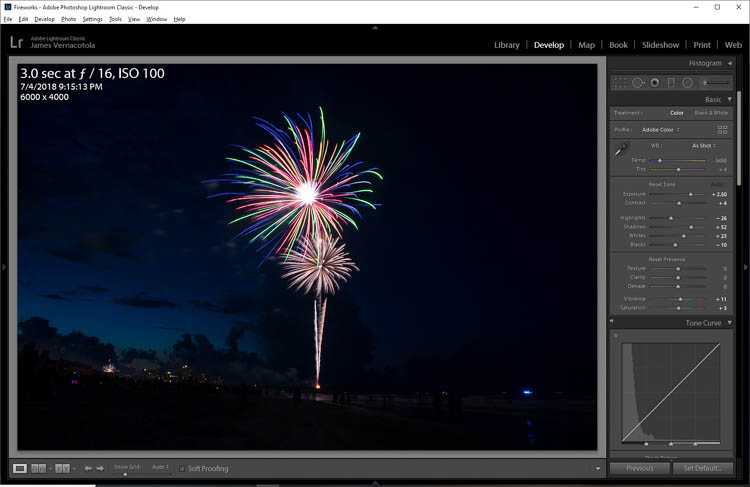
Tone and Presence
First, In order to start bringing back the colored streaks, I brought the Highlights down from -26 to -45, and the exposure down from 2.5 to 2.25. Then I increased the contrast from +4 to +14 and brought up the shadows from +52 to +65. I left the blacks and whites exactly as Lightroom set them. I love rich and saturated images, so I find that I’m generally a bit heavy-handed with the Vibrance and Saturation sliders. Your taste may be different than mine here. I bumped the Vibrance from +11 to +27, and the Saturation from +3 to +6. You may choose to adjust the white balance here as well. I’m going to leave it as-is for this one.
Curves and Cropping
Next, I made some adjustments to the Tone Curve. The highlights mostly affected only the hot spot in the middle of the top blast, so I brought them down a little, to -20. Then I adjusted the Darks and Shadows to +21 and +25, in order to continue trying to reveal more of the surroundings.
Finally, I went ahead and cropped the image to my liking. Normally I save cropping until the end, but I went ahead and did it now, to help make the image and sliders appear larger for viewing on this page.
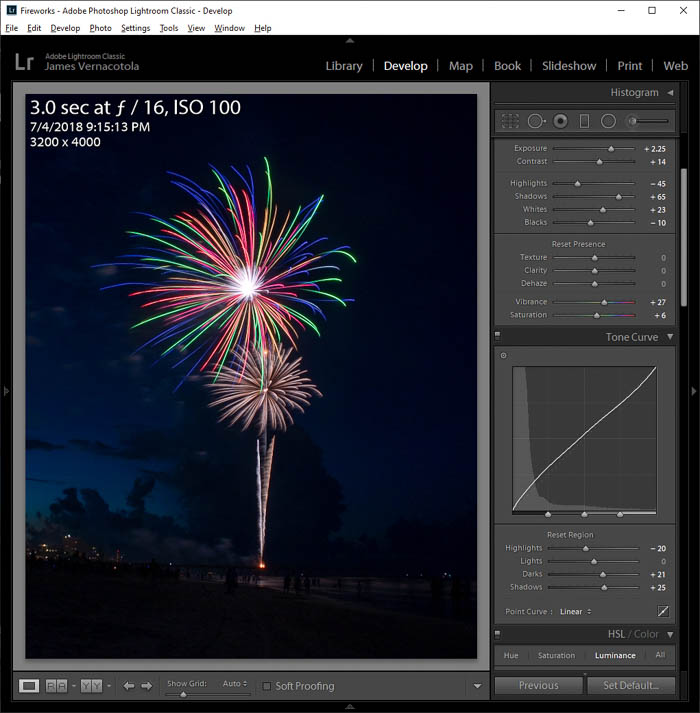
Step 4 – Local Adjustments

Next I made some local adjustments using the Adjustment Brush Tool.
1. First I selected the very small hot spot area at the center of the blast, and knocked down the highlights just a bit more, to -14. At this point, I’m satisfied that I got every bit of detail out of that spot that I can, without making it look obvious that I was trying.
2. I love photographing fireworks in the “blue hour,” so I wanted to bring out a little more of that blue sky if I could, as well as some more detail on the beach. So I selected the entire area below and around the two blasts to increase Exposure by 0.43, Shadows by 13, and Contrast by 20. I used an extremely large selection brush for this one (size 80) with feathering maxed to 100, in order to blend the brightening of the sky at the bottom with the sky at the top that I left alone.
3. Next, I wanted to reveal a bit more detail and light in the buildings on the left. The Texture slider is relatively new in Lightroom. I like to think of it as a more subtle version of the Clarity slider. It reveals some detail, but not to the point where it creates tons of noise and/or artifacts. I selected the area of the buildings and cranked the Texture all the way to 82 in order to add some, well, clarity to those buildings on the left a little more.
4. Finally, I felt the water on the shore was still a little too dark so I selected the area of the water, and increased the exposure by .57.
Step 5 – Finishing Touches
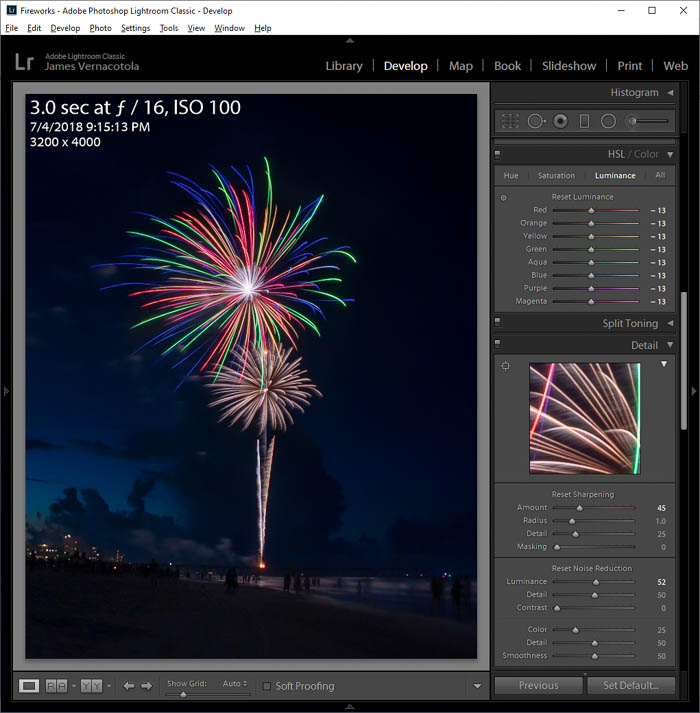
Above is the final product. To put the finishing touches on the photo, I made 3 more global edits, and considered it complete.
- All of that shadow recovery had really created some noise, so I used the Luminance slider under Noise Reduction and brought it up to 52. Don’t be afraid to experiment with numbers that high. Increasing Noise Reduction tends to reduce the sharpness of an image. It certainly softened up the beach area some, but it affected the streaks in the fireworks very minimally. You will need to experiment with each image individually to find the right balance that works for you.
- I bumped the Sharpening from 40 to 45, just for good measure.
- Finally, you already know I like the rich colors, so I brought down the Luminance to -13 for each color, to make those colors pop just a little bit more.
If you’re a photographer, you’re an artist, and the settings you choose in post-processing are your personal preference. Some people don’t like to bring up the shadows as much as I do, and others don’t like to be so heavy-handed on Vibrance and Saturation. That’s ok; this is why it’s an art. Each edit we make on an image is an expression of our own taste, and what makes us happy.
4. More Tips and Tricks
Now that we’ve completed the Preparation, Execution, and Post-Processing lessons, here are some bonus tips to help you make sure you’re next outing is a success.
Start Early
Right: Fireworks over EPCOT, Walt Disney World – March 18, 2019 | Canon EOS 5D Mark IV | Canon EF 17-40mm f/4L USM | 27 sec at f/18, ISO 100
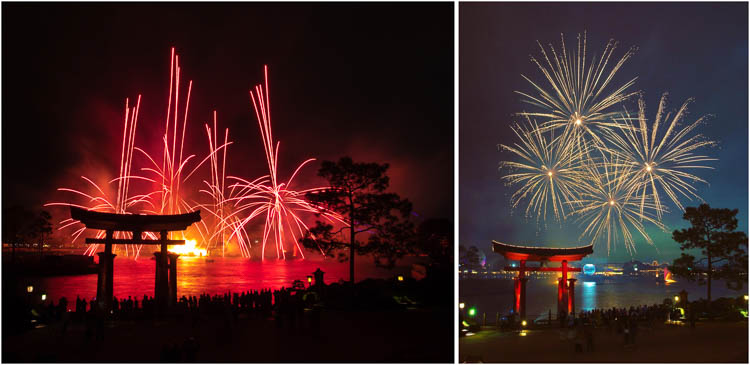
In order to maximize the available light surrounding the firework, start shooting immediately after the latest firework ends. Check out the photo on the left. In this 6.6 second exposure, the Japanese Torii gate is a silhouette. But later in this show there was a break in the fireworks, and I was able to hold the shutter open for 27 seconds. This was enough time to bring out the colors of the Torii. See the photo on the right. Also, look at all the light my sensor managed to gather within the smoke and around other parts of the image. Remember the discussion about shutter speed above, and that it doesn’t matter how long your shutter speed is. The fireworks will look the same whether it’s a 6.6 second or 27-second exposure, but a longer exposure will gather more ambient light from the surroundings.
… But Not Too Early

Don’t get greedy and start too early though. Wait until the entire previous firework dissipates before you open the shutter again. If you don’t, you might accidentally include the final moments of the previous firework in your next image. Look at the photo above. It’s a nice photo of fireworks at Disney World, but I opened the shutter a split second too early, and gathered the final light from the previous blast. It doesn’t completely ruin the image, but it doesn’t do it any favors either.
Oh The Humanity
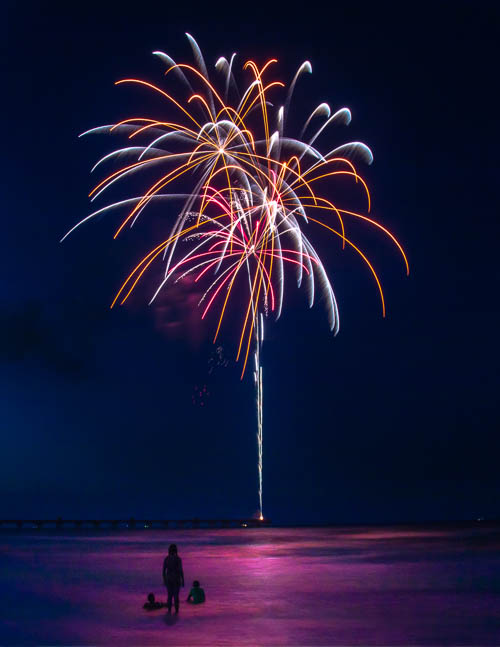
Should you include humans in your photos? When I first started photographing fireworks, I always made my best effort to avoid including the backs of other people in my frame. Sometimes it was unavoidable however, so I just dealt with it when I had to. What I learned was that many of the images that resulted from this turned out fantastic. My advice would be to include people if you think it will artistically add to the appeal of the image.
The First One is Always the Best One
Well, not always, but a lot. I love it when I manage to capture the very first blast of a fireworks display because there’s absolutely no smoke in the sky to contend with. This is relatively easy on New Years Day at midnight because I know precisely when the first blast will be. I just open my shutter 10 or 20 seconds before midnight, according to my phone, and let the exposure run through the first blast. It may be a bit tougher on July 4 or other dates, but still worth trying for. One disadvantage though, is you don’t know exactly how big the fireworks are going to be in your frame. You can see that I framed this one too tight and lost some of the blast outside the frame….This is where the next tip comes in handy:
Go Wide
If you are unfamiliar with the location you are photographing, I recommend setting your focal length a little extra wide, to be sure you capture the entire blast. Once you’ve seen a few and have a good idea of how much they are filling your frame, you can dial in the focal length.
Just One Baby, Just One
If you go out and photograph fireworks enough, there will be times when you get very few keepers. There are so many factors that can affect your results. Wind, rain, location, blast frequency, etc, can really change the difficulty of making keepers. Sometimes you may only come back with one good image. That’s ok. I made this photo on a bad weather evening in the rain, after the race was canceled. I rushed to the roof to set up after the fireworks started, and held a piece of cardboard over the lens in the rain. Because of smoke, wind, and raindrops, this was the only usable image I came away with. It’s nice to get lots of great images, but you just need one to make the outing a success.
Crank the f-stop For the Finale
As a general rule, I like to turn the aperture wheel a few extra clicks to the right when the finale comes. There are going to be several blasts that will be making a lot of light, in a short period of time. It will also likely light the surroundings more, so the smaller aperture shouldn’t cause the image to be any darker. Here’s an image of the Disney World “Happily Ever After” Fireworks Finale. Just as the finale began, I adjusted the aperture to f/22 and left the shutter open for 10 seconds for this sequence, which included no less than 23 blasts. I’ve never really loved the colors in this one, but I do love the fact that I was able to control the light from all of those blasts in a single exposure.
Bring the Noise
I briefly went over this in the post-processing section, but want to mention it again to drive the point home. Obviously we’d always love to leave the shutter open long enough to expose the surroundings well in a fireworks image, but sometimes that’s just not possible. Don’t worry too much about the increased noise when you are trying to recover shadows in the surroundings of the fireworks. Lightroom’s noise reduction slider has become really a fantastic tool, and I’ve found it to be great for saving images that were just too noisy and grainy.
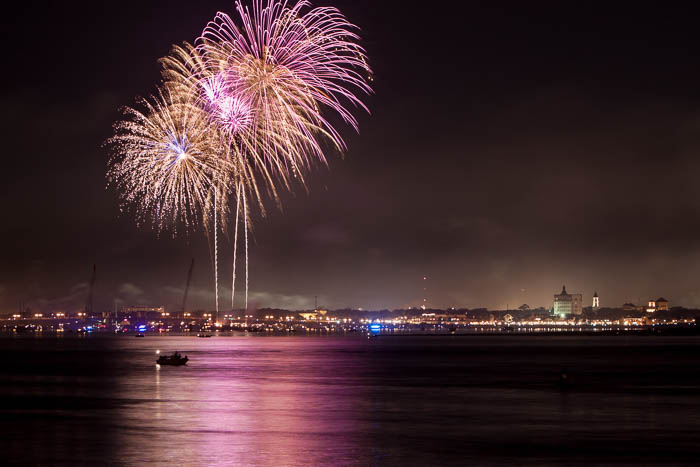
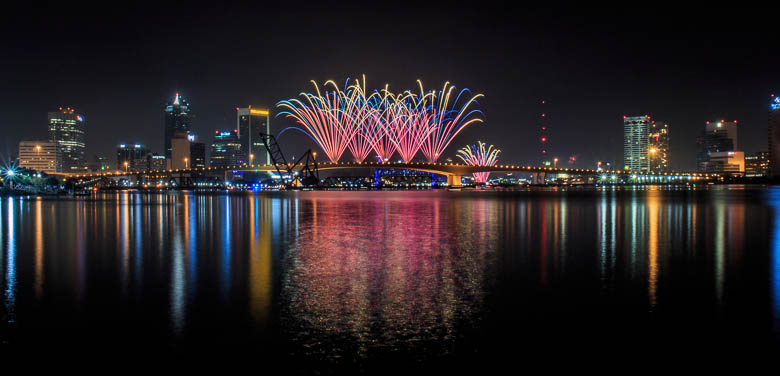
Reflections
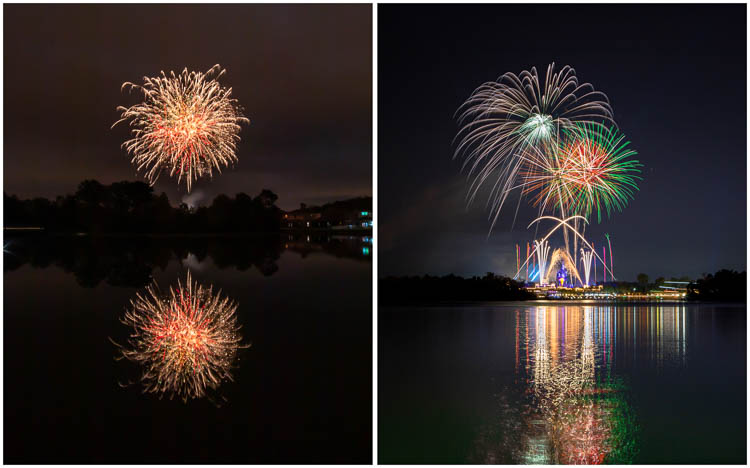
Right: Fireworks over Magic Kingdom, Walt Disney World – January 2, 2020 | Canon EOS 5D Mark IV | Canon EF 24-105mm f/4L IS II USM | 2 Exposures Combined With Software | 1. 20.0 sec at f/16, ISO 100, 2. 11.0 sec at f/22, ISO 100
I’ve always loved photos with reflections in them. If you ever have the opportunity to set up across a lake or pond from fireworks, consider giving it a try. The reflections on the water always make for a pleasing image.
Blue Hour
Blue hour is the time of day when the sun has already set, but the sky is not completely dark yet. If you have the chance to make fireworks during blue hour, that really adds a level of vibrancy to them.
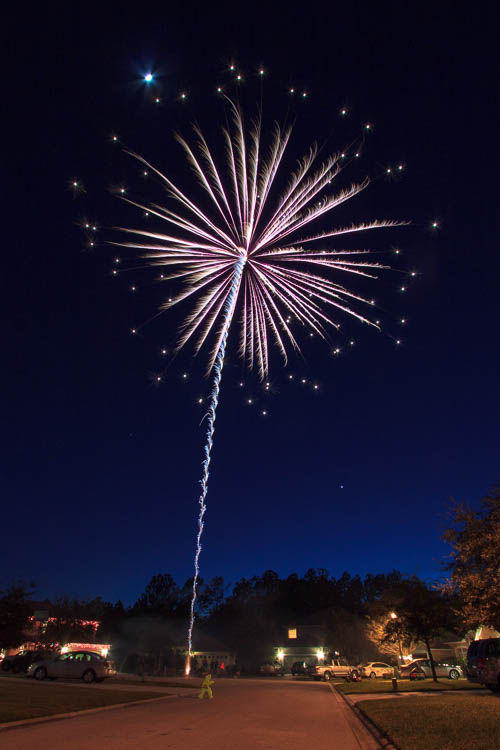
Make Some Images Before the Show
Right: Consumer Fireworks over Jacksonville Beach, Florida – July 4, 2018 | Canon EOS M5 | Canon EF-M 15-45mm f/3.5-6.3 IS STM | 4.7 sec at f/16, ISO 100
Once you’ve gotten set up in your spot and dialed in all of your settings, be prepared for people around you shooting fireworks. You never know when you might manage to grab a nice image of somebody’s consumer firework blast.
The Combine
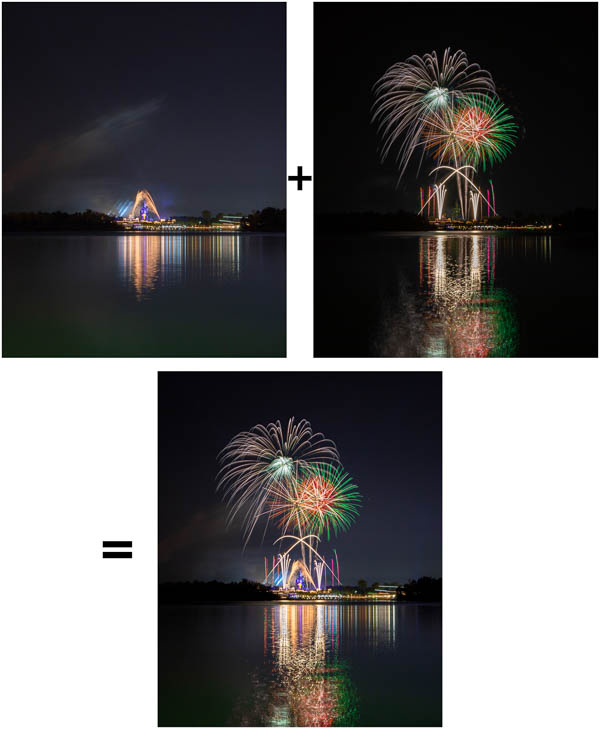
This is a technique that is slightly more advanced, but anyone can do it with just a little practice. Sometimes you may want to combine two fireworks photos into one photo. Maybe you have a few photos that fill up different parts of the frame and you think they would look great as one image. Or perhaps you made a well-exposed control photo before or after the fireworks display, and want to combine it with a nice image of a fireworks blast where the background was underexposed. I’m currently working on an article about how to do this, so check back in this paragraph for a link to that article.
Adapt
Be ready to adapt. If your location or lens isn’t working for you. Don’t be afraid to move to a new spot, or switch lenses during the show. Ideally you want to have as many images with the same frame and focal length as possible, because it makes it easier to combine images later. But if something’s not working, don’t continue with it; make the change.
A Couple Things I Never Tried
Here are two things I’ve never tried when photographing fireworks, but they are worth mentioning in a fireworks photography tutorial:
Black Felt Technique
This technique is similar to combining photos as we discussed above, but doing it in-camera instead of later with software. Basically, once you open the shutter, you leave it open long enough to let the sensor gather a firework blast, but then you continue leaving it open. You would take something dark and non-reflective, and cover your lens with it. This essentially “closes” the shutter by preventing it from gathering any light. Once you see another firework on its way up, you take the felt away and let the sensor gather all of the light from that one as well. Now you have two fireworks exposed onto the same photo.
For me, on the rare occasion that I want to combine images, I like using the software and having more control over the manipulation. However, if you’re more of an in-camera purist and are not into using photo-editing techniques to manipulate pixels in your images, then this might be worth trying. That’s what’s beautiful about art; everyone has their own way of doing things and none of them are wrong.
…in photography there’s always something new to learn. This is why the art is so wonderful.
Neutral Density Filter
This concept involves using a Neutral Density Filter in order to make images of fireworks at a wider aperture. It certainly makes a lot of sense – if you use a 3-stop ND Filter, you can stop down your aperture by 3 stops to avoid diffraction. You may ask yourself, how in the world does this guy have a 7000 word tutorial on how to photograph fireworks, but never used an ND Filter to do so?? Well, in photography there’s always something new to learn. This is why the art is so wonderful. It certainly does seem like a nice concept, though, and maybe one day I will try it. If I do, I’ll certainly add my experiences to this tutorial. If you’ve ever tried it, I’d love to see your results as well.
Conclusion
I truly hope this article will help you make some amazing images of fireworks. If you have any questions or any other type of feedback, please don’t hesitate to leave a comment below or contact me. I’ll be happy to help out in any way that I can. Also, if you learned something in this article and applied it, I’d love to see your images as well!
Remember that these tips are here to help you, but the bottom line is, when you begin shooting, you take what your environment and surroundings will give you. The more times you try, the more you’ll recognize what you need to do to maximize your opportunities. Best of luck to you, and happy shooting!
James is a part-time photographer in Ponte Vedra, Florida, and creator of jamesvernacotola.com. He does freelance work for corporate clients and for Jacksonville.com, but his favorite gig is covering his kids’ sporting events as a parent with a camera.
Nice article, I found it very helpful and timely as tomorrow is the fourth of July. One thing you forgot to mention is be sure to bring extra batteries not only for the camera but also for the shutter release.
Thanks again for the tips.
That’s a great point, John; thanks for the suggestion! I’ll add it to the article.