When Copying Files from iPhone to Windows
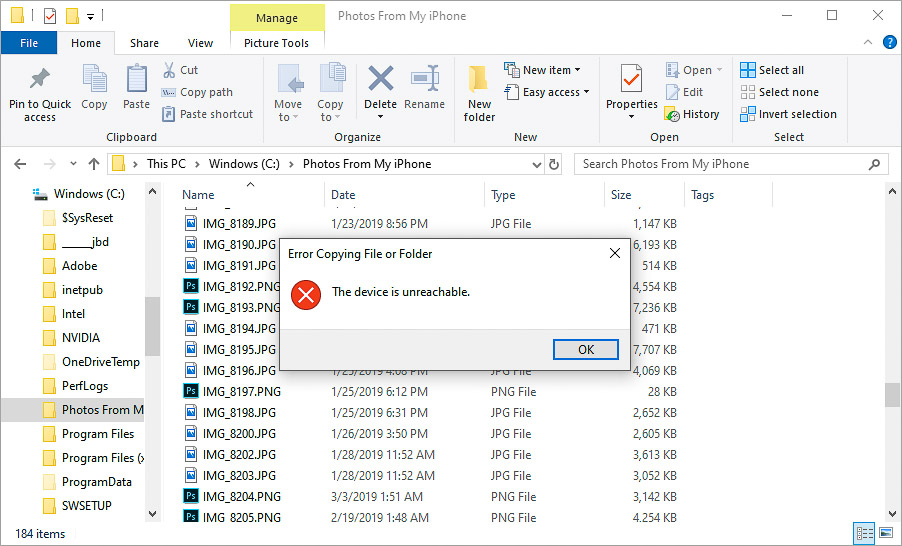
You probably found this page because you are having trouble copying your iPhone photos to your PC, and continuing to get the extremely frustrating “The Device is Unreachable” error.
Copying photos from my iPhone to my PC has always been a somewhat delicate and frustrating process. Lately, it has gotten even worse – if not impossible – since I began getting “The Device is Unreachable” error. After tons of Googling and trial and error, I’ve finally found a solution that works.
This turned out to be an extremely easy fix for me, and hopefully it will be the same for you. It involves transferring the photos and videos to your computer as their native iPhone files. This means for example that the photos will have an extension of .HEIC instead of .JPG. This might be transparent to many of you, but some of you will need to download a new codec from Microsoft in order to view the images and videos. I’ll explain more about this after we discuss the solution.
The Solution
In your iPhone’s settings, go to Photos, then scroll to the bottom where it says “TRANSFER TO MAC OR PC.” Likely it is currently set to “Automatic.” Change that setting to “Keep Originals,” reconnect your phone to your PC, and attempt the transfer again.
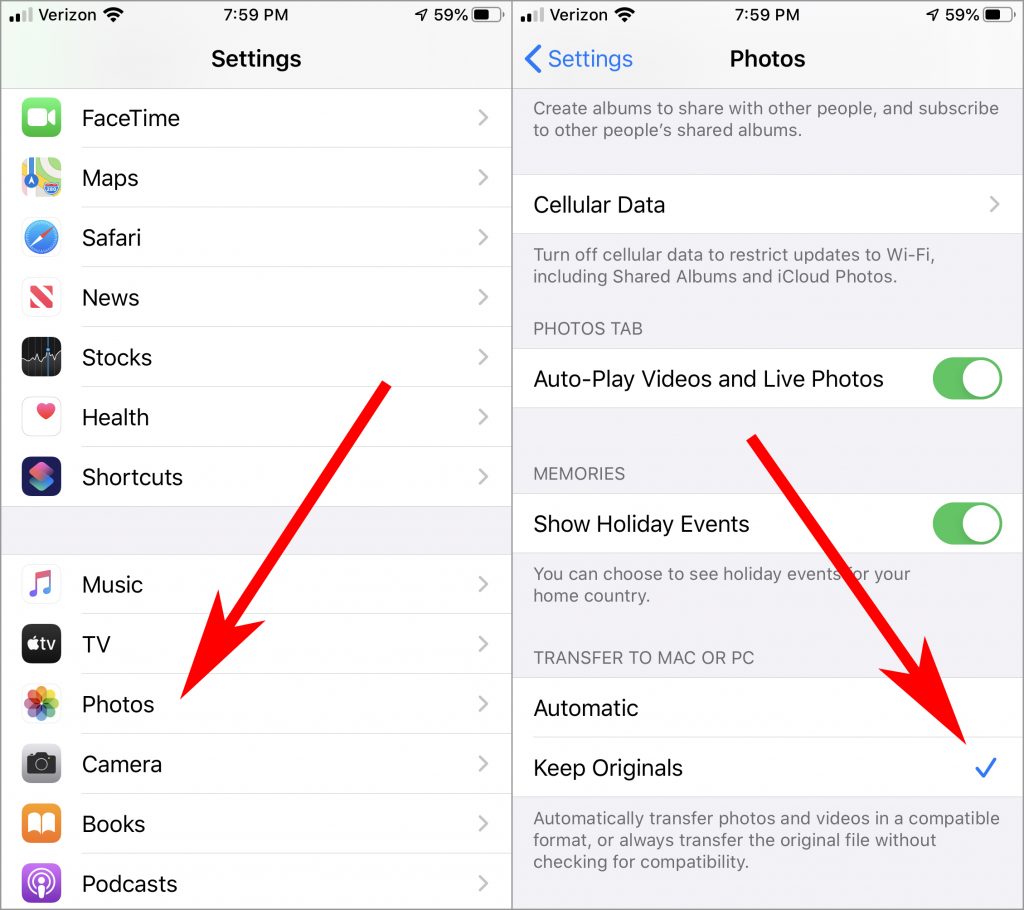
And that’s it. Please read on in order to make sure you are able to access the photos and videos.
What Changed?
First I’ll share a bit of background, without getting too technical. In 2017, Apple began using a new more efficient encoding process to save photos and videos made with the iPhone. This new process is called High-Efficiency Image File Format, or HEIF. For photos, they replaced the .JPG format with a new one named .HEIC, which stands for High-Efficiency Image Coding. For videos, they changed the compression process to HEVC (High-Efficiency Video Coding) but still use the .MOV extension. These new cutting-edge compression standards were adopted in order to store photos and videos using significantly less disk space, without losing quality.
By default, when you connect your iPhone to your PC and use Windows Explorer to transfer your images and videos, your phone will attempt to convert them back to a standard that is natively readable by your PC. This means it will turn your photos back to .JPG, and use older encoding technology to re-encode your videos. When you make the change we discussed above, to “Keep Originals” in your iPhone settings, you are telling the phone to transfer your photos as they are, instead of trying to convert them before the transfer. This means the photos moved to your PC will be .HEIC instead of .JPG. The videos will be HEVC compressed .MOV files.
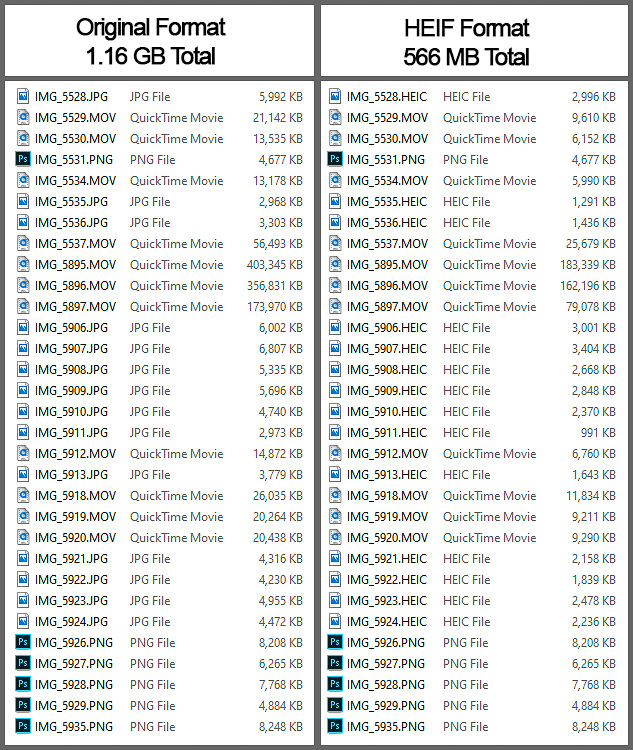
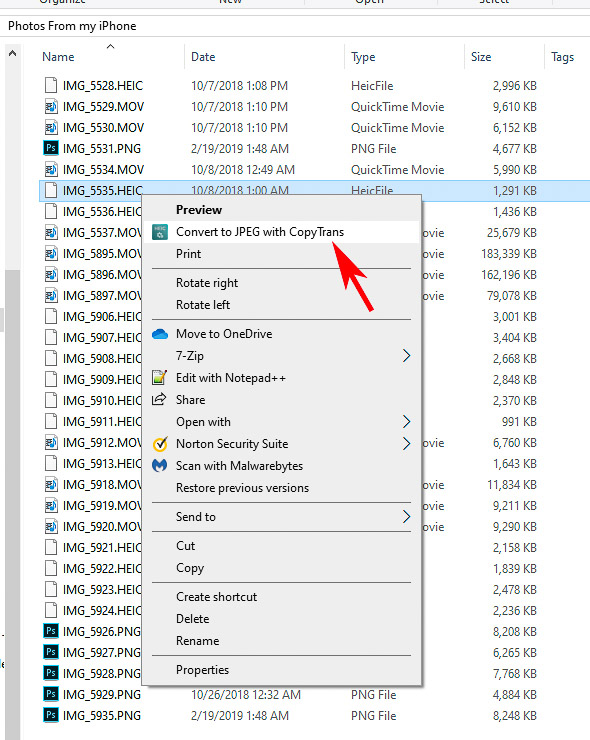
Check out the image below to see the differences in file sizes between the old and new compression methods. Notice how the .JPG and .MOV files have greatly reduced file sizes when switched to .HEIC and HEVC compressed .MOV files. The .PNG files have the exact same file sizes, so it appears Apple did not change the compression for screenshots.
But wait! I’d rather my iPhone just leave my JPGs alone!
If you would just like to stop dealing with the HEVC files, there’s an option for that on the iPhone as well. It won’t solve your current problem, but will likely eliminate “The Device is Unreachable” errors in future transfers to Windows. I’m choosing to move forward with the new format for now. The change has been quite seamless for me, and also saves some space on my hard drive as a bonus.
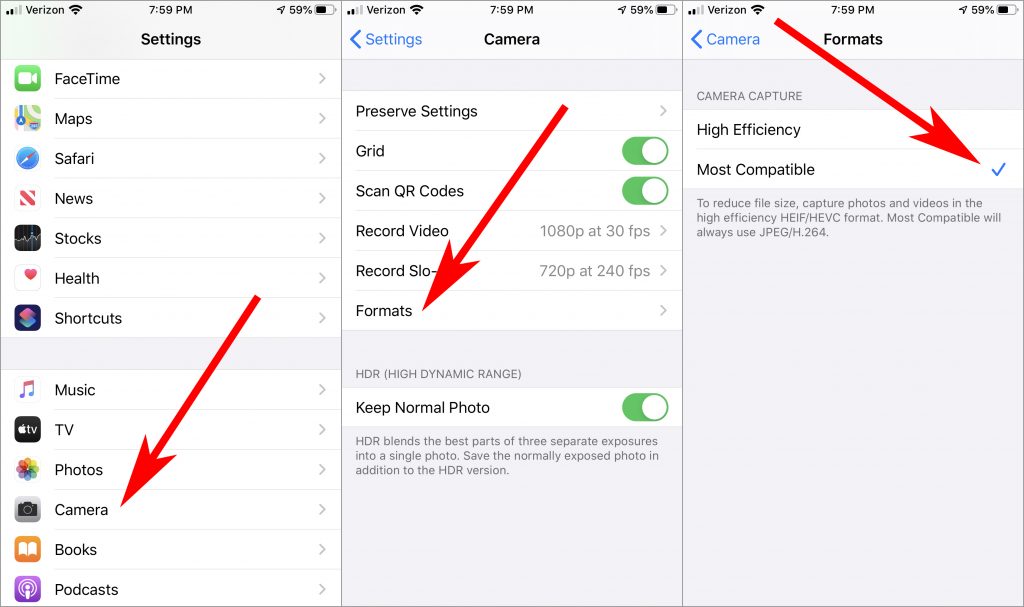
In your iPhone’s settings, go to Camera, then “Formats”, then switch CAMERA CAPTURE from “High Efficiency” to “Most Compatible.”
How To Open .HEIC and HEVC Files in Windows
The fact that Apple switched to this new format is great because it allows us to save a whole lot more images and videos on our iPhones than we used to. It also allows for fewer bytes to be transferred over the internet, which is a benefit to anybody that is on a data plan. However, they sort of left many of us Windows users high and dry when it comes to viewing and converting the files.
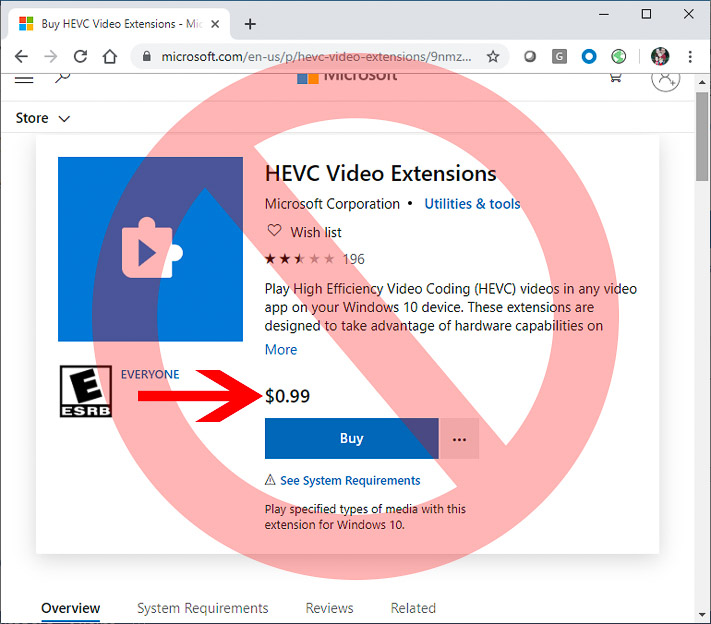
For most users who update their Windows 10 regularly, accessing the files should be seamless. Just double click them like normal, and they will display in Microsoft Photos or Windows Media Player. If you cannot access them, however, Windows will likely encourage you to download and install an app called “HEVC Video Extensions” at a cost of $0.99.
Now, I don’t mind spending a dollar or two when I know it’s going to improve the functionality of my computer, but it just seems kind of strange that Microsoft would try to squeeze a dollar from you for an app like this. Thankfully there’s a solution, and you can keep your greenback safe and sound in your back pocket.
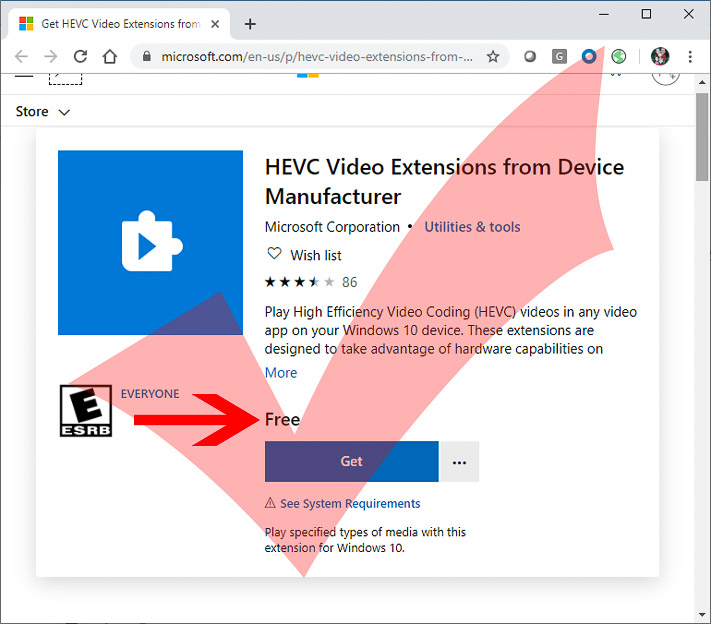
There is another app in the Microsoft Store that does the exact same thing, and it’s free! It’s called “HEVC Video Extensions From Device Manufacturer.” I don’t know if there’s any difference between the two apps, but I do know this one works because it’s the one I use. Click the link below to access the app in the Microsoft Store:
https://www.microsoft.com/en-us/store/p/hevc-video-extension/9n4wgh0z6vhq
.HEIC vs. .JPG
I copied this photo from my iPhone twice, once as a .HEIC file and once as a .JPG file. Straight from the phone, it’s a 12 MP image with the dimensions of 4032×3024. The .HEIC file is 1,294 KB and the .JPG file is 2,976 KB.
Converting HEIC to JPG
Since the HEIC and HEVC files are so small compared to JPGs, I’d lean towards leaving them as they are for storage on your computer. If you ever need to convert some to .JPG, there are a few software programs that will do it for you. There are also several solutions where you upload the photo to websites online to have them converted. I’m not in favor of these solutions because you are giving others access to your images, which you may want to keep private.
I use Adobe Lightroom, which works great (Version 7.5 or later), but it’s not free. If you don’t have Lightroom, I recommend an app called CopyTrans. Once you install CopyTrans, you can just right-click your image in Windows Explorer, and choose to convert it to JPEG with CopyTrans. Click here to check out CopyTrans.
When I first started getting “The Device is Unreachable” error and learned of this new image format, it was a bit annoying to me that Apple made this change without first telling us about it. But after some research, I found that maybe I just wasn’t listening. If you want more information about the switch to .HEIC, check out this article from 2017 on cnet.com. If nothing else, I’m glad that Apple is working on making our photos and videos more efficient.
Conclusion
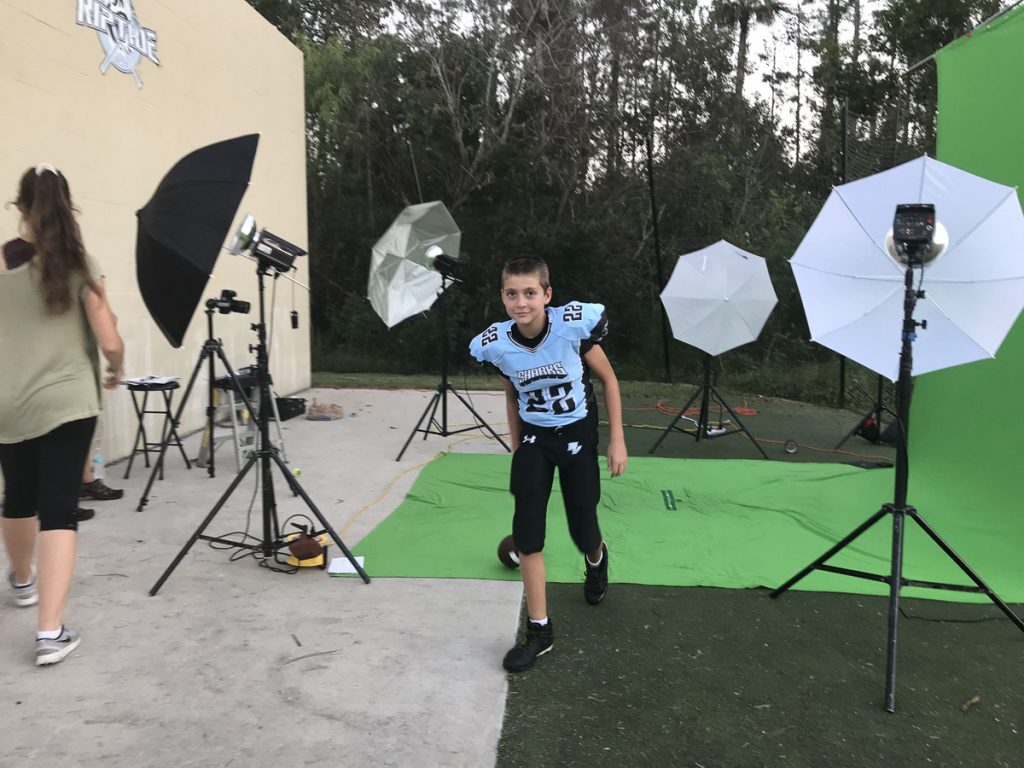
This issue was very important to me because I take thousands of photos and videos on my iPhone. As a photographer, I use my DSLR to take photos primarily, but I also use my phone quite a bit, because it is extremely convenient, and also makes great images. I use the phone on vacations, at games, and also just taking general photos of my kids. And I’m sure plenty of you do the same. If you are experiencing “The Device is Unreachable” error, and you cannot get your vacation photos or your kids’ photos over to your computer, don’t ignore it. Make one of the changes I described above so you don’t lose your memories. Good luck and Happy Shooting!
James is a part-time photographer in Ponte Vedra, Florida, and creator of jamesvernacotola.com. He does freelance work for corporate clients and for Jacksonville.com, but his favorite gig is covering his kids’ sporting events as a parent with a camera.
Live forever, James. Why can’t Micro$oft or Apple do simple writeups of HEIC self defense like this? Very helpful. Thank you.
This is very helpful thank you! However, I am trying to transfer videos then burn to dvd, will I be able to use the video files in the .HEVC format or do I need to decompress them? or convert? It’s very confusing because the files still say .MOV the only difference seems to be the size. Thanks again!
Thank you for writing this it means a lot!:)
Super big help after 90 minutes of frustration. Thank you!
Thank you SO MUCH. After dealing with this frustration for months, your solution worked. This is such a relief and all my stress has been dissipated. Thank you again
Unfortunately, this didn’t help me. I’ve tried every “fix” I can find online and nothing has worked. Now, my phone is almost out of storage and that’s after going through them time after time to cull through my photos and videos to see what I can sacrifice. I’m all out of things to delete. Thank you for sharing and for the exceptional “fix.” It’s nice to have something that actually explains why this issue is happening and ways you can learn to live with it. I just wish could figure out what’s going on with my phone and/or pc.
Thanks for the information. This is such a great explanation and so easy to understand.
Unfortunately, this fix didn’t work for me either. I also tried to put the app on my computer and the free one is no longer available. After purchasing the one for 99 cents, it says I have no devices linked to my account so I still can’t transfer my pictures. I’ve been trying for days so that I can have some personalized Christmas gifts made but still no luck. This is so frustrating that it makes me want to get rid of my iPhone.
Unreal… After 6 months of F-ING around with trying to fix this issue that suddenly/abruptly occurred with a usually seamless flow of iPhone to PC pic Xfer, your wisdom and helpful posting has both brought joy, and perhaps a cure to these “unprecendented times”! TY SOOOOO much!!
God bless you! I have been struggling with this issue for far too long! Thank you!
Thank you for the thorough explanation and easy fix!
Thanks so much – I was fighting with this to download and recover some space on my iPhone. I did have to change the setting first to “Keep Originals” and then power off my phone and back on again. That was the fix I was looking for!
That worked perfect to get them from iphone to windows computer! Very grateful!